Thursday, April 28, 2011

You Can Not Has: Games You'll Never See - Part 2

So cool looking.

This gem actually evolved into something you and I know well - the NES.  Nintendo's Advanced Video System was their first protoype of the US version of Japan's Family Computer, or Famicom.  As you can see, it was originally supposed to use a cassette tape drive, like that of the Commodore 64 and Atari computers, as it was one of the computing standards at the time.  Thankfully, cartridges were employed in the final release, and Nintendo's shift in focus from the home computer market to the home gaming market dropped the keyboard and joystick, for better or worse.

I can't help but imagine an alternate universe where Nintendo became a successful computer company, only to be buried by PC and Mac the way Commodore was.

Wednesday, April 27, 2011

How To Replace A Sega Saturn Save Battery

Seeing this screen?  Sorry, but your saved games are gone.

So, your Saturn wiped out all of your saves?  We can fix that.

As you know, the Saturn uses internal storage for saved games, rather than the memory cards most other CD-era systems used.  What you might not not know, however, is that the Saturn uses a battery - like a computer's CMOS battery - to achieve this.

The battery powers an RTC, or Real-Time Clock chip, which is basically like a watch that's running all the time, which is why devices like the Saturn and your computer always know what time it is, even when they've been unplugged.  This is also why your microwave loses the time after it's been unplugged, as there's no power source for the internal clock.

This clock chip also keeps active the Saturn's internal RAM, where your saved games are written.  It works like a computer's RAM - once it's turned off (the battery dies) everything within it is wiped clean.

So, if your Sega Saturn won't save, don't toss it out or donate it to Goodwill. This is the easiest and cheapest issue to fix.

First, you'll need a replacement battery.  Do not search eBay or Amazon or anywhere else for a Sega Saturn battery - sellers will often brand this battery specifically as a Sega Saturn Replacement Battery and overcharge, sometimes upwards of $10.  What you're looking for is a "coin" battery, labeled CR-2032.  I got mine at Fry's Electronics for $1.75, but you may be able to find one cheaper online.


Step 1 - Open the battery door.

First off, open the battery door on the back of the Saturn as shown above.  

 You can now see the battery.  Fight off the invading cats as they try to 'help' you.

Just press down on the clip and pull out.  If you're already lost, there's nothing I can do to help you.  Go ahead and just send your Saturn to me.  I'll take good care of it.

Step 2 - Lift up the battery.

Gently, with your fingernail under the battery, pry it out by pushing up.  If you have no fingernails, use a very, very small screwdriver, as pictured.  Don't try to force in a large one and be careful, it should pop out with minimal effort.  

Step 3 - Put in the new battery.


Before inserting the new battery, you may want to give the inside a shot or two of compressed air - my battery holder and this whole section were covered in dust.  When you're ready, insert the battery as shown - lettering facing up - into the battery holder, inside the clip.  With your finger, gently push down until it snaps into place.  Put the battery cover back on, and you're done.

No, really, that's it.  You just fixed your Saturn.

Fire it up and put in today's date to be sure.  Unplug the Saturn and wait a few minutes, then power it back up.  If it saved the date and boots into your game, you're all set, and it should save your games for several years.

As an aside, you may want to buy a Sega Saturn Backup Cartridge for backing up your save games to avoid this issue in the future.  You'll still need to replace the save battery, but having the backup means nothing is lost.  Sadly, though, these aren't cheap.

Enjoy your properly-saving Saturn!

Tuesday, April 26, 2011

The Cutting Edge of the Past - Games at CES 1991

The Consumer Electronics Show was the E3 of the '90s.  Take a look back at the forefront of 1991's gaming technology in this clip from Computer Chronicles.

Friday, April 22, 2011

How to Spot a Bootleg SNS-101

Since my post on the SNS-101 and my suspicion that it might be a bootleg, I've gotten several hits from people looking for information on how to tell if their SNES Mini might be a fake.  So, with all credit for methods and images to the original guide at gamesx.com, here's a guide to telling these systems apart.

First off, if you have the original box, there should be a red box where a hole is cut out - this allowed a retailer to see the serial number for each system.  This red box is present on the fake as well, but with no hole cut out.  If there's no hole, you've got a fake.  Sorry, but I have no images of the box for comparison.


Not there?  Not authentic.

The next thing to look out for are the screws at the bottom of the console.  They should be of the "gamebit" variety, as seen above.  Nintendo used these for just about everything.  If you need a reference on hand, grab any Nintendo game cartridge, from the NES to the N64, and you'll see these screws.  If you don't see these screws in your SNES Jr., and instead see standard Phillips screws, you've got a fake.

Wait, these aren't the same?  What gives?

The image above should prove to you just how good these bootlegs look - to the untrained eye, you'd have no idea.  For reference, the one on the left in this image is a fake.  For all images that follow, the fake is on the right.  Sorry about that, as mentioned above, credit goes to gamesx.com.

Clue #1 - the buttons.

As you can see, the buttons on the fake are a darker purple.  With no frame of reference, however, it's hard to use this indicator to your advatage unless you have a real one in front of you to check against.  But, they'll look cheap and they'll feel cheap, squeaking when moved.


Wow, Mario looks like a bit of a meth head on the fake.

As you can see, the labels on the fake are a poor photocopy of the original.  On the "repair service" sticker, Mario has lost so much definition that he looks like he has dark circles around his eyes... let's not mince words, the poor plumber looks like an addict.  All those shrooms may well have caught up with him.

The label at the bottom must not have copied well, because it's looks as if they had to recreate it from scratch.  The fonts are all wrong - the model information is not bolded, and a lot of it just seems off.  The Nintendo logo here is most damning, though, the font is all wrong.  If you're unsure, compare the logo against one of your cartridges.  They should look the same.

Thin plastic, soft edges = fake.

If you've ever owned any other Nintendo products, you know that Nintendo-manufactured consoles are very high quality.  The SNS-101 is no exception.  If the system feels like it was cheaply made, it probably wasn't made by Nintendo.  The next indicator is the quality of the plastic case.  The embossed logo, as shown above, should be raised above the surface of the plastic.  The (R) registered trademark symbol next to the logo should not only be distinguishable, you should be able to feel it.  The plastic on a knockoff may well be translucent in places as well, especially along the corners.

I hope this has been helpful in determining whether your SNES is a fake.  If you have any further questions or comments, feel free to leave them below.

Monday, April 18, 2011

Goodwill Hunting - Sega Saturn

Hello there, you gigantic, heavy pile of plastic.

The Sega Saturn was released in May of 1995, taking North America completely by surprise, but not in a good way.  The announced release date was to be September 2, 1995, a ruse to cause Sony's PlayStation to release 4 months later.

This surprise launch caused more trouble than it was worth - very few games were ready, as third party developers were shooting for a September release, and as the price point of $400 was announced, Sony was there to announce they'd be undercutting them by $100.

By the time the PlayStation finally released, Sega had sold around 80,000 Saturns, with Sony selling over 100,000 PlayStations in their first day.

This lead continued and Saturn trailed behind the Nintendo 64 and PlayStation, only seeing spikes in sales when new arcade ports were released.

My Saturn was yet another $15 Goodwill marvel.  The base unit with power and video cables was marked at $9.99, and each controller (they had 3 of them) was marked at $4.99.  Since I was only able to grab one, I went for the 3D controller pictured above.  This is the only Saturn controller with an analog input, designed for playing Nights Into Dreams.  In the hierarchy of Saturn Controllers, this rates a bit higher in my book than the normal pads.

Score!

Also, stuck in the cartridge slot (and thus included in the price) was this ST-Key.  These cartridges normally run around $20 and allow you to use Japanese and European Saturn games in your US Saturn, and vice versa.  Helpful, because some of the best stuff for this system was only ever released in Japan.

In my research, I'm finding that nearly every game for this system is uncommon, and I am kicking myself for not picking up that mint complete copy of X-Men: Children of the Atom that was also on the rack for $4.99.  $4.99 for an awesome game that Rarityguide estimates at $40.  But alas, I was broke, and the hardware alone put me over budget.

The system needs a good cleaning.  Also, it will not hold the date entered and all save games from the previous owner have been wiped clean, so it seems that the save battery needs to be replaced.  More information and a guide will follow as I get this part replaced.


Thursday, April 14, 2011

Love Theme From The Cheetahmen


It has come to our attention that The Cheetahmen may just be the most beloved characters in the history of gaming. This is for you.

Don't worry. We will fight for you.

Wednesday, April 13, 2011

You Can Not Has: Games You'll Never See - Part 1

The Action GameMaster.

Active Enterprises was a tenacious little game company back in the early 1990s.  The company is best known for their awful unlicensed Action 52 cartridges, as well as the "Cheetahmen" franchise they just couldn't let go of.

This was to be their most ambitious project, the Action GameMaster.  The claim is that this portable device, which looks roughly the size of a modern laptop computer, would be able to play Sega Genesis, NES and SNES cartridges, as well as a CD-ROM add-on, which presumably would allow for Sega CD games as well.  Of course, they'd be releasing their own first party titles as well - Cheetahmen III was meant to be a flagship title.

I can hear your groans from here.

It's not hard to tell why this system never made it to market.  It had a projected retail price of $500, and that's just the system.  This entry price would give you access to one title at launch - the elusive Cheetahmen III.  I know you're salivating at the thought.  In order to play your NES, SNES, Genesis and CD titles, you'd need additional cartridge adapters, each sold separately.  These "adapters" were to be essentially miniaturized versions of the consoles themselves - this is the only way this would have been possible at the time.  With that in mind - this would have been one hell of an investment.

But this, of course, was all theory - by the time Active Enterprises went out of business in 1994, no actual work had been done on the Action GameMaster.  I weep to think of the horribly coded side-scrolling garbage I never got to play.

Tuesday, April 12, 2011

Stuff I Had Lying Around - The Famicom Color GBA SP

This is relevant to my interests.


The beloved system we knew here in the United States as the Nintendo Entertainment System as known by another name in Japan - The Nintendo Family Computer, often called "Famicom" for short.  The design was vastly different, sporting a red on pearl color scheme with gold highlights, rather than the grey on black scheme the US got.  The controllers were permanently attached, so if one failed, the system would have to be serviced.  Their original design was a top loader as well, whereas our top loading NES came much later.

Wallpaper fom Mario's 25th Anniversary - Isn't it lovely?

If you haven't picked up on it yet, I'm a bit of a fan.  The Famicom is this blog's namesake, and did a lot of really cool things that the US market never got to see.  But we're not here to talk about the Famicom, we're here to talk about this GBA SP.

So cool.

This Game Boy Advance SP model was released to coincide with the release of several Famicom titles on the GBA, known as the "Famicom Mini" series.  The US got a very similar release in the form of the "Classic NES" series, minus Star Soldier and Mappy.  The US also got an NES-styled Game Boy Advance, the "Classic NES Limited Edition", as shown at the bottom.  Same thing, different market.

I love this thing.

It's hard to capture the colors properly, but it's lovely.  The red/pearl style is eye-catching even to someone who doesn't have a clue what it's modeled after - I used to get comments often while playing in public.  It's aesthetically awesome.

In terms of practical use, though, it's exactly the same as any other Game Boy Advance SP.  But hey, mine's way prettier than yours.

Thursday, April 7, 2011

Amazon Expeditions - Super Game Boy


The Super Game Boy was released in 1994, allowing you to play your Game Boy games on your SNES console, and 32 built-in color palettes added color to otherwise monochromatic Game Boy titles.  In addition, several of the more popular games had pre-configured color palettes and borders, such as Metroid II and Legend of Zelda: Link's Awakening.  The Super Game Boy was released prior to the Game Boy Color, and, as such, will not play Game Boy Color exclusive titles.

Mine ran around $6.50 shipped from Amazon.com, and is in great condition, but I don't currently have any Game Boy games on hand to try it out.

Tuesday, April 5, 2011

Amazon Expeditions - The SNS-101

Isn't it cute?


The SNS-101, also known as the "SNES Mini", "SNES Jr" or "SNES 2" was Nintendo's second generation Super Nintendo console, redesigned to be smaller and lighter than the original release.  It was released in 1997, after the release of the Nintendo 64 and Playstation, as a low cost alternative to these higher-end systems.

The redesign dropped a few things most casual users wouldn't notice.  The RF port is gone, but by this time very few people were still using them.  The expansion port is also missing, but that was unused in the US.  It was used in Japan for the Satellaview add-on, and would have been used for the Super Nintendo CD add-on, if deals with Sony and Panasonic hadn't fallen through.  As a side note - this is how the Playstation was conceived, as well as Panasonic's absolutely terrible Nintendo-licensed CD-i titles.

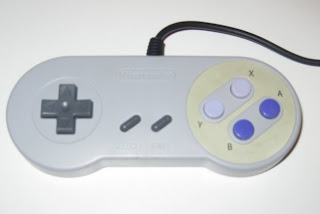
Mine was purchased over Amazon for $40.  It included a third-party AC adapter which I'll be replacing with the real deal, an RF switch that this system can't use anyway, and a bootleg controller.

...something isn't right, here.

Originally packaged with the SNS-101 were newly redesigned controllers, designated SNS-102.  The Nintendo logo was now embossed rather than silkscreened and the buttons were darker to provide more contrast.  This is not that controller.

This controller has a model number SNS-005, which is the model number for the original SNES pads.  This is also not that controller.

So what is it?  A fake.  It feels cheap, like the plastic would snap if you applied too much pressure.  The color of the sticker around the buttons is completely wrong no matter which revision.  The buttons are also extremely clicky, and the D-Pad just feels weird.  The logo on the back, as well, looks like it was recreated with the wrong font.  A nice try, but it's not fooling anyone.

That got me thinking, though... is this console an original?  There are bootlegged SNS-101 consoles that appear to be exactly the same as the official version.

Some very helpful information can be found here to determine whether you've got an official Nintendo SNS-101 or a bootleg.

After going over and over the system, I'm convinced it's the real deal.  There are no build quality issues, the "Gamebit" screws are used, and all of the stickers and labels look exactly as they should.  My guess is that the original controller was lost along with the AC adapter, and the seller went to eBay for replacements.  eBay is apparently full of these pirate SNES controllers, so it's not a stretch.

I'm just happy the system is real - the rest can be replaced cheaply enough.


Saturday, April 2, 2011

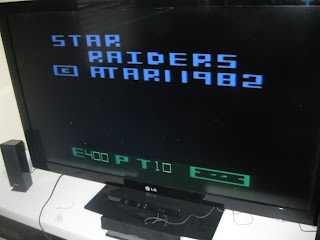
Craigslist Finds - Atari 2600 system, 2 of them.

I actually can't even play this game.

This is a console that needs no introduction, but I'll attempt to give one anyway.  The Atari 2600 is an icon of gaming that spans multiple generations.  Depending on your age, this may literally be your grandfather's gaming console.  Originally released in 1977, it was hardly the first home gaming console, but it was the first to become a true household name.


Yuck.


And there's one of the two I purchased yesterday from a seller on Craigslist.  Both were only $10, but didn't come with AC adapters, games or controllers.  It's still a steal.

The one pictured was the worse of the two.  It looks nasty, yes, but you should see the inside.


Eww, just.. eww.

Seriously, eww.  Dust, debris, and.... is that sawdust everywhere?  Paint flakes?

Well, the board and components have been cleaned extensively with rubbing alcohol, and the outer shell with glass cleaner.  It may sound odd, but glass cleaner is one of the best things you can use on consoles from this era to get the years of grime and nastiness off.  Steel wool was also used to remove some paint from the cable, as well as in the polishing of the metal switches.

Here's the result:


I left the "Atari Super Service" sticker on there for the laughs.

Secondary Atari 2600 is now ready for sale.  Any takers?  This 2600 sold for around $20.  Glad I put in the effort!


Friday, April 1, 2011

A Birthday Gift - Sega Game Gear

In great shape, for a Game Gear.
6 AA batteries and a unit that won't fit in your pocket unless you wear very, very large pants.  This was the portable gaming arena in 1991, and the Game Gear was on the bleeding edge of technology.

This is essentially a miniaturized Master System with a lower output resolution and a much larger color palette.    The two pieces of hardware are so similar, in fact, that Sega also released a cartridge adapter that would allow you to play your Master System library on the go.  Of course, the lower resolution meant anything with small sprites (like bullets) wouldn't display properly, so you'd often take damage and have no idea why.


Sega's advertising campaign centered around one concept - color is better than monochrome.  They mocked Nintendo with every revision of the Game Boy, essentially calling it a system for colorblind idiots, as seen above.  Regardless of their aggressive and scathing advertising techniques, the Game Gear was successful, but was never able to dethrone Nintendo's Game Boy.  This was likely due in part to the lack of third-party titles, though some heavy hitters like Mortal Kombat did make it out.

Ooh, free game!

On to my new Game Gear.  This was a birthday present from my awesome wife.  It included no AC adapter, but uses Sega's 2103, the same adapter used in the Genesis Model 2 and 32X.  The system is in great shape, considering the quality I've seen in some of these.  Relatively unscratched screen, both battery covers still attached, and it even came with a copy of Aladdin stuck in it.


Note the angle from which this picture was taken.

There is one issue, however, and it's one that plagues these systems.  At the time these systems were manufactured, there was an industry-wide capacitor crap-out.  Every capacitor in every release of this system is lousy, and if your screen is still 100% perfect, you're either a liar or extremely lucky.  It'll screw up tomorrow.

When I first turned it on, I noticed brightness and contrast issues that couldn't be resolved with the contrast wheel.  The color bleed is atrocious and sprites are sometimes indiscernible from their backgrounds.

I turned it on today, and a capacitor has apparently now blown - the screen can now only be seen when tilting the system far forward, as pictured above.  It's a hard system to photograph, but you can see the issues to an extent.

I'll be cleaning and restoring this system, along with new capacitors all around.  Stay tuned.