
Saturday, March 31, 2012
super famicall of duty is awsum
i made this site way more cool cuz i think old games are stupid and old. the ps3 is stupid too. xbox rulz.
who plays mario and stuff that stuff is for babys and old peeple. real men play cod on xbox cuz its cool and my mom has to buy it for me cuz the guy at the store is a dick. Maybe i cn get her to buy sum beers too and then we can have a party and kick her out and get girls.
me and my friend talked to a girl once and she was like o ur so hot and i was like ok cool ur hot too lets do it and she was like ok and then my friend left and we did it while i was playing xbox.
i even play xbox while im hving sex cuz sex is awsum and so is xbox and i do them at the same time cuz im awesum.
like with ur mom that one time. she was like o baby and i was like move ur head i cant see the tv and she was like ok.
this site isent for treyarch cuz their bad at makeing games. infinity word is waaaaay better then them at life and u suck at life if you dont like them.
me and my bros are gonna play tonight and own u n00bz cuz were awsum and u suck and your not good and were awesum. look for SuperFamiCallOfDuty on xbox live so i can shut ur ass down with a bullet in ur nuts.
peace.
--Note: This is the single most difficult thing I've ever had to write. Happy April Fools' Day, if you didn't pick up on the obvious.
Wednesday, March 28, 2012
Repairing The Power Glove - Part 1

The Power Glove. Everything else is child's play.
Mattel's NES accessory, the Power Glove, probably needs no introduction, but I'm going to give you one, anyway.
The Power Glove, originally released in 1989, was the first attempt at motion control available to the average consumer. Sporting bands of plastic with carbon ink in each finger, The Power Glove would track finger movements by measuring the amount of resistance in each band. In addition, two small speakers in the front would send ultrasonic pulses, and the receivers, positioned around the television, would determine the glove's position based on these sounds.
In theory, it was a great idea. In practice, well... the Power Glove is nearly universally panned for having imprecise and confusing control.
But, that's enough history, let's get down to it. This Power Glove was purchased from someone on Craigslist. He said that the glove was registering random button presses, and I bought it for $30.

The victim... err, patient.
This Power Glove is in awful shape. First, the fabric is frayed almost everywhere.

Yikes.
Second, some of the finger sensors are disconnected from both the fabric and plastic top portion of the glove.

That shouldn't be visible.
So, of course, when you make a fist, the top part of the glove stays put, and the finger sensors flap about, explaining the odd button presses.

I'm not flipping you the bird, I swear. It's just stuck that way.
So, immediate course of action? Fix those finger sensors.
To do this, I straightened out the sensors and made sure they were seated correctly, then applied super glue around the edge of the plastic piece. I aligned the cloth portion - a faux leather bit - with the plastic top and held it together until it bonded.
Next, using a pair of scissors, I trimmed as much of the frayed cloth as I was comfortable doing, in order to make it look less like I stole it from a homeless man.

That's a bit better.
And with that, I went to test it. Now, the finger triggers work exactly as they should. Great! But what about the motion tracking?
Well, not so much. Control drifts off to the right and rarely recognizes any moves to the left. But, the pulses can be heard coming from both of the speakers, so it isn't the glove.

I love the Power Glove. It's so... no, no, I'm not going to say it.
I guess next time, we'll tear into the receivers!
Sunday, March 25, 2012
FamiComplex Video Reviews - The NES PowerPak
FamiComplex puts the NES PowerPak through its paces! Does your favorite NES mapper work? Find out!
The NES PowerPak is a new flash cartridge for the NES. If you've ever used the R4 for the DS or any similar products, you're familiar with the concept. You place the system software on a Compact Flash card like this one along with any NES ROM images you want to run, stick it in, start it up, and play.
The whole thing is extremely simple, and it works just the way you'd expect it to.
Now, this may be a bit different from my normal reviews and filled with nerdy details. If that isn't your cup of tea, you may want to go back and watch one of my older reviews.
Okay, still with me?
Good.
Let's talk about memory management controllers.
The Famicom - and by extension, the NES - was built to be extensible. The system could only do so much on its own, so Nintendo employed memory management controllers to add additional RAM, allow for more sprites on screen, and eventually allowed for the battery save we all know and love.
I'll spare you the technical details on how these worked and what was different across different cartridges, but there is plenty of technical detail around the internet for the curious.
In the US, Nintendo had a death grip on the market, so only their own in-house chips were used - third parties were not allowed to make their own cartridges.
The only exceptions were the unlicensed carts by Tengen, Active Enterprises and Color Dreams.
In Japan, however, every company had their own set of chips.
While this was great for the consumer at the time, when NES emulation came along this became a real compatibility issue. New code needed to be written to support each and every individual chip.
The pieces of code written to emulate these chips were called mappers.
Why is all of this relevant? Well, obviously, a card of this nature can't have every one of these chips included. The solution, then, is to simulate these in software.
So, mapper files are included with the PowerPak software in order to handle this task. A chart is available on their website as well displaying which mappers work, which are buggy, and which are unavailable.
Well, RetroUSB aren't the only ones making mapper files for the device. Loopy's mappers, available here, extend the capabilities of the PowerPak even further.
Between the two sets of installed mappers, just about everything works, including the extra audio hardware available on Famicom games like Akumajou Densetsu, the Japanese version of Castlevania 3. Save batteries work as well, which is more or less required.
Even Famicom Disk System games and NSF music files are supported!
Nintendo Vs. arcade games, however, are not supported, and I didn't really expect them to be. The colors are way off, and there's no way to insert coins.
I haven't personally tested them, but there are also a set of mappers that actually allow you to use saved states, like the ones you'd get in an emulator! Sure, I can see how that'd be useful - but if you use them, you're officially not a bad enough dude to rescue the president. Just saying.
One major issue with this device is Compact Flash card compatibility. I went through 3 different cards before finding one which fully works with the device.
Rather than buying and returning tons of cards, try to find a Dane-Elec card like this one. Trust me, you'll save plenty of time and money buying one you know will work up front. This is the brand that RetroUSB sells along with their devices, and they always seem to work, but again, your mileage may vary.
So, in conclusion, the PowerPak does a fantastic job supporting nearly everything out there, which is a great feat. In addition, RetroUSB and Loopy continue to work on these mappers, so expect support to improve as development goes on. One day, it may well support every NES and Famicom game ever made!
Wednesday, March 21, 2012
The Birthday Gift Card - Amazon Expeditions
Among my birthday gifts this year was a gift card for $50 at Amazon.com. Since my birthday was primarily filled with modern stuff, I decided I'd go retro with it, and this is what I came up with.

First order of business - I needed a true classic for my new Sega Master System, and no, ALF wasn't going to cut it. It may have been pricey, but a complete in case Phantasy Star is just what this collection needed. This accounted for more than half of the money spent.

Next, some new NES games. Rad Racer, Gradius, Wizards & Warriors, R.C. Pro-AM, Marble Madness and Kung Fu Heroes.
You may have noticed a small difference between these games and my normal acquisitions - these are all really good games. When setting out to purchase games of my own accord (when not out deal hunting) I choose my games much, much more carefully. Sure, I could have found these at a thrift or flea market for considerably less, but you know what? Sometimes it doesn't matter. Just go for it.
Now, if you'll excuse me, I have a handful of awesome games that demand my attention.

One of my most wanted.
First order of business - I needed a true classic for my new Sega Master System, and no, ALF wasn't going to cut it. It may have been pricey, but a complete in case Phantasy Star is just what this collection needed. This accounted for more than half of the money spent.

That is more like it!
Next, some new NES games. Rad Racer, Gradius, Wizards & Warriors, R.C. Pro-AM, Marble Madness and Kung Fu Heroes.
You may have noticed a small difference between these games and my normal acquisitions - these are all really good games. When setting out to purchase games of my own accord (when not out deal hunting) I choose my games much, much more carefully. Sure, I could have found these at a thrift or flea market for considerably less, but you know what? Sometimes it doesn't matter. Just go for it.
Now, if you'll excuse me, I have a handful of awesome games that demand my attention.
Tuesday, March 13, 2012
How To Get Extra Sound Channels From The NES PowerPak On Your Famicom
Nintendo's Famicom was a superior design to the NES in a number of ways, though inferior in others. The biggest difference between the two is the disappearance of two pins in the cartridge connector which allowed the cartridge to carry additional audio hardware. This meant that developers could extend the existing sound with additional channels or even - in the case of Lagrange Point - add FM sound synthesis on par with the sound hardware in the Genesis.


For someone who grew up with the NES, the sound is mind-blowing. After all, our games couldn't do that - just look at the American version of Castlevania 3. The music was remixed as well as it could be for the hardware available in the NES, but it doesn't hold a candle to the Japanese release.
So, you've got a Famicom, and an NES PowerPak Well, you'll be happy to know that the PowerPak is able to reproduce those additional sound channels, but it'll take a small amount of work on your part.
Credit where credit is due: This is Drakon's method from this forum post, and it works beautifully.
First, you'll need one of these cheap NES to Famicom adapters. This is the one I use, at $10. Don't get ripped off. Also, you'll need two 10k, 1/8 watt resistors. You can get these at Radio Shack fairly cheaply.

Cheap enough to risk destroying, but be careful anyway.
You'll want to flip the adapter over to the back, as shown. Do you see the two sets of pins that are bridged? You'll want to cut the bridge between the set on the right.

Sorry, that's hard to see.
Use a multimeter to verify there's no continuity between the two pins. You'll want to be sure.
From here, you'll want to solder a resistor between the left pin that you just cut free, and the NES pin directly above it. Then, below the resistor, solder another resistor leading to the pin on the right, as shown below.

Sorry.
I apologize for both the crappy picture and the terrible solder job. Tip: Don't be in a hurry.
EDIT: I forgot to mention, as well, even with this mod, your other NES games will still work as normal in your Famicom.
EDIT: I forgot to mention, as well, even with this mod, your other NES games will still work as normal in your Famicom.
That's all you need to do! Try out any supported game with extra sound channels and enjoy!
Goodwill Hunting - Pitfall 3D and Game & Watch Gallery

Eh, why not?
Planted firmly in the "it was on sale, so why not?" territory are these two pickups from 2 days ago. Pitfall 3D was half off at around $1.50, Game & Watch Gallery at it's regular price of $4. Neither have very much value, so this isn't a pickup for the record books.
In other news, It looks like I'll be needing a bit more time on my current game review, so I'll be bumping up the review of the PowerPak to this week. Look for it soonish!
Saturday, March 10, 2012
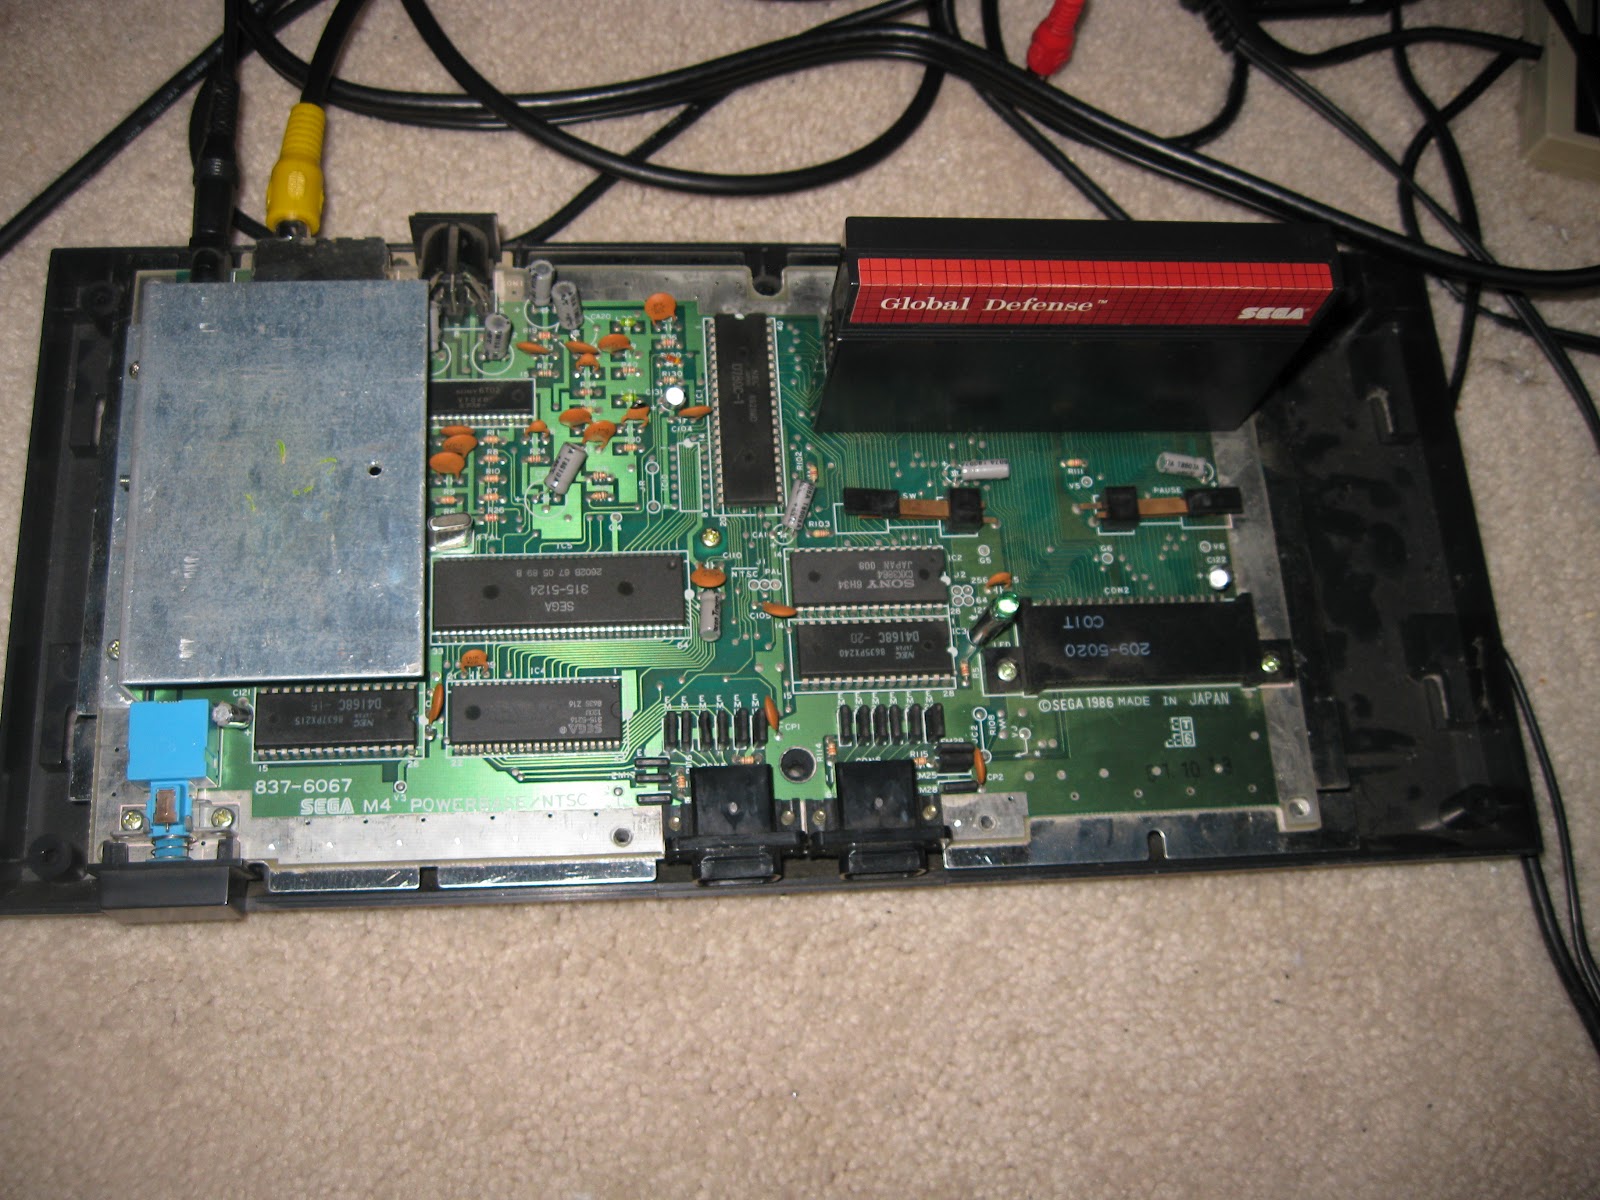
How To Repair A Sega Master System - Assuming You Did The Obvious
So, your Sega Master System won't turn on. It worked last time you tried it, but now it just stares blankly when you press the power button.
I know what you did. You know what you did.
You plugged in a Nintendo AC adapter, didn't you? Don't worry about it. Everyone has done it - not necessarily with this system, but with something.
But the important thing is, yes, you've fried your SMS. And now, we're going to fix it.
First things first though, a bit of boring technical info. The reason it's broken is pretty simple, really. AC adapters are appropriately named - they're meant to convert AC power into DC power that your device can use. In most cases, such as Sega's adapters, that's exactly what they do.
Not so, in Nintendo's case. Nintendo's wall warts actually feed the system AC power which wreaks havoc on your poor DC device. Generally, the first and last thing to get fried in the Master System is the voltage regulator.
So, in order to fix it, you're going to need a soldering iron, solder, a desoldering braid, and a phillips screwdriver. Also, you'll need to buy a new voltage regulator, a +5V Fixed-Voltage Regulator 7805, which is available at Radio Shack. Who knew Radio Shack still sells components? I thought they only sold cellular phones these days.

Remove the six screws holding the case together, highlighted above. No hidden screws, these are all you'll need.

Now the RF shielding - six more screws here. Three in front, one on top, and two in the back. Again, they're all pretty easy to find.

Here's some more. Two around the power switch, one dead in the middle of the board, and two around each cartridge slot. The board should now lift away from the bottom of the case.

This photograph was almost as hard to get as that screw was to get out. As you can see, there's a piece of metal screwed to the board - this is the heat sink for the voltage regulator. See that screw? You'll need to squeeze your screwdriver around the components on the board to take that screw out from inside the heat sink. Go ahead, I'll wait.

Now that you're thoroughly irritated, remove the heat sink by taking out the two screws under the board.

Now, your voltage regulator is free!

As you can see, the original voltage regulator is bent slightly so it can be attached to the heat sink. Bend yours in the same way. It doesn't have to be perfect, but it should bend easily.
Sorry, I have no pictures of the next steps as I don't have enough hands to hold the camera while holding a soldering iron. There are a million soldering tutorials on YouTube and across the internet, so if you need assistance, please refer to one of them.
Using the desoldering wick and iron, remove the existing solder from the voltage regulator and pop it out. You can now slide the new one in - but wait! It is much, much easier to screw the voltage regulator to the heat sink now. Screw the new one in to the heat sink and slide the pins through the holes. Now solder it in.
You don't want to do it the other way. Think of what a pain it was getting it out - imagine that in reverse.
So, get the heat sink back on and hook it up.

The power LED should light up, and you're back in business!

Follow the steps in reverse, as always, to reassemble the system. This may not work on every system, so if you're still having trouble, use a multimeter to check where the issue might be. If it did work, have fun! I know I will.
I know what you did. You know what you did.
You plugged in a Nintendo AC adapter, didn't you? Don't worry about it. Everyone has done it - not necessarily with this system, but with something.
But the important thing is, yes, you've fried your SMS. And now, we're going to fix it.
First things first though, a bit of boring technical info. The reason it's broken is pretty simple, really. AC adapters are appropriately named - they're meant to convert AC power into DC power that your device can use. In most cases, such as Sega's adapters, that's exactly what they do.
Not so, in Nintendo's case. Nintendo's wall warts actually feed the system AC power which wreaks havoc on your poor DC device. Generally, the first and last thing to get fried in the Master System is the voltage regulator.
So, in order to fix it, you're going to need a soldering iron, solder, a desoldering braid, and a phillips screwdriver. Also, you'll need to buy a new voltage regulator, a +5V Fixed-Voltage Regulator 7805, which is available at Radio Shack. Who knew Radio Shack still sells components? I thought they only sold cellular phones these days.

Six easy screws.

More screws on the RF shielding.
Now the RF shielding - six more screws here. Three in front, one on top, and two in the back. Again, they're all pretty easy to find.

Now to get that board off.

This screw is the bane of my existence.
This photograph was almost as hard to get as that screw was to get out. As you can see, there's a piece of metal screwed to the board - this is the heat sink for the voltage regulator. See that screw? You'll need to squeeze your screwdriver around the components on the board to take that screw out from inside the heat sink. Go ahead, I'll wait.

Now that you're thoroughly irritated, remove the heat sink by taking out the two screws under the board.

Finally. Ugh.
Now, your voltage regulator is free!

Fuzzy, but you get the idea.
As you can see, the original voltage regulator is bent slightly so it can be attached to the heat sink. Bend yours in the same way. It doesn't have to be perfect, but it should bend easily.
Sorry, I have no pictures of the next steps as I don't have enough hands to hold the camera while holding a soldering iron. There are a million soldering tutorials on YouTube and across the internet, so if you need assistance, please refer to one of them.
Using the desoldering wick and iron, remove the existing solder from the voltage regulator and pop it out. You can now slide the new one in - but wait! It is much, much easier to screw the voltage regulator to the heat sink now. Screw the new one in to the heat sink and slide the pins through the holes. Now solder it in.
You don't want to do it the other way. Think of what a pain it was getting it out - imagine that in reverse.
So, get the heat sink back on and hook it up.
Green light! Green light!
The power LED should light up, and you're back in business!

Poor city. But at least my Master System is working!
Follow the steps in reverse, as always, to reassemble the system. This may not work on every system, so if you're still having trouble, use a multimeter to check where the issue might be. If it did work, have fun! I know I will.
Friday, March 9, 2012
Famicom Games, A Sega Master System And The Weakest Thrift Trip Yet
So, in response to a Craigslist ad, I took a trip out a bit farther out of the way than I usually go, and picked up an awesome deal. I'll come back to that.
While I was out, I also took a run to my usual day-trip thrift shops.
I've had a sort of unspoken superstition for a while. In every playlist I make before I head out, I sneak in Sievert's Party Dog, the song I use as the theme for my videos. If the song plays at random during the trip, it'll be a good trip. Well, today I proved there's some merit to that - the song didn't play before I reached my first shop.
No matter how many stores I went to, it was the same. Common games or no games at all. Every single place, nothing. No consoles, no accessories, and no games.
I even stopped at The Bins (the Goodwill Outlet store) and picked through everything they had. Nothing. Nothing at all. Finally, just as I was about to leave and call the whole trip a bust, I found this hiding in the display case.

Yes, it generally goes for about 50 cents less than I paid, but damn it, I conquered the stores tonight. I found something, and therefore I won. So there.
I'm kidding, of course. I love taking these trips, even if I find nothing at all. There's a thrill in the hunt; digging through the trash and finding the hidden treasures.
Next, I received an awesome package from Japan. 4 Famicom games for $26 shipped, from Sean at http://famicomblog.blogspot.com. None of the markup you usually get on these games... seriously, check eBay. Anyway:

The games are Final Fantasy II, Final Fantasy III, Tower of Druaga and The Goonies. You can't beat $26 for these games, when you figure how much you're usually charged just for shipping from Japan.
So, on to the big Craigslist score, and the reason for the trip out today. The listing was for a Sega Master System, several controllers, and some games. He said he couldn't get it to start up but didn't have the correct AC adapter, so I figured I'd give it a shot, since I've got two of them. Fired it up when I got it home... and it does not start up.
Looks like I've got a new repair project.
EDIT: A small update - I've found out the original owner tried to start it up with an NES AC adapter, which is a very, very bad idea. The NES adapter puts out AC and is converted internally, whereas the SMS adapter converts to DC. Plugging in an NES adapter will fry your Master System. Just don't do it. I know it fits, but that doesn't mean it works. If you have a Sega Genesis Model 1 AC adapter, that'll work just fine.
Now, we buy a replacement voltage regulator.


One of the controllers is an Epyx joystick, which makes me smile.
The games are the reason I went for it, though. Well, one, in particular:


Global Defense, Monopoly, Golvellius, Rescue Mission, Missile Defense 3-D and Alf. Believe it or not, Alf is a very rare and difficult to find game, netting around $40 boxed.
How much did I pay for the whole set? $25. Even with a non-working Master System, I still win the day.
Yard sale season starts up again soon, though. Get ready, I've got a feeling this year's going to be a great one.
While I was out, I also took a run to my usual day-trip thrift shops.
I've had a sort of unspoken superstition for a while. In every playlist I make before I head out, I sneak in Sievert's Party Dog, the song I use as the theme for my videos. If the song plays at random during the trip, it'll be a good trip. Well, today I proved there's some merit to that - the song didn't play before I reached my first shop.
No matter how many stores I went to, it was the same. Common games or no games at all. Every single place, nothing. No consoles, no accessories, and no games.
I even stopped at The Bins (the Goodwill Outlet store) and picked through everything they had. Nothing. Nothing at all. Finally, just as I was about to leave and call the whole trip a bust, I found this hiding in the display case.

My favorite Game Boy game, when I was very young. Also I didn't have a Game Boy.
Yes, it generally goes for about 50 cents less than I paid, but damn it, I conquered the stores tonight. I found something, and therefore I won. So there.
I'm kidding, of course. I love taking these trips, even if I find nothing at all. There's a thrill in the hunt; digging through the trash and finding the hidden treasures.
Next, I received an awesome package from Japan. 4 Famicom games for $26 shipped, from Sean at http://famicomblog.blogspot.com. None of the markup you usually get on these games... seriously, check eBay. Anyway:

My first 4 Famicom games - pretty good choices so far.
The games are Final Fantasy II, Final Fantasy III, Tower of Druaga and The Goonies. You can't beat $26 for these games, when you figure how much you're usually charged just for shipping from Japan.
So, on to the big Craigslist score, and the reason for the trip out today. The listing was for a Sega Master System, several controllers, and some games. He said he couldn't get it to start up but didn't have the correct AC adapter, so I figured I'd give it a shot, since I've got two of them. Fired it up when I got it home... and it does not start up.
Looks like I've got a new repair project.
EDIT: A small update - I've found out the original owner tried to start it up with an NES AC adapter, which is a very, very bad idea. The NES adapter puts out AC and is converted internally, whereas the SMS adapter converts to DC. Plugging in an NES adapter will fry your Master System. Just don't do it. I know it fits, but that doesn't mean it works. If you have a Sega Genesis Model 1 AC adapter, that'll work just fine.
Now, we buy a replacement voltage regulator.


One of the controllers is an Epyx joystick, which makes me smile.
The games are the reason I went for it, though. Well, one, in particular:


Global Defense, Monopoly, Golvellius, Rescue Mission, Missile Defense 3-D and Alf. Believe it or not, Alf is a very rare and difficult to find game, netting around $40 boxed.
How much did I pay for the whole set? $25. Even with a non-working Master System, I still win the day.
Yard sale season starts up again soon, though. Get ready, I've got a feeling this year's going to be a great one.
Saturday, March 3, 2012
Can't Win Em All - Today's Thrift Run
Today's haul is not great. Not at all. But, I really wanted to grab some new games, so here we are.

First stop was Salvation Army, which is always hit or miss where retro games are concerned. Today was a pretty big hit. Nine Game Boy games in a plastic bag, marked at $10.99 for the lot. I'd have passed, but then I saw that Mary-Kate and Ashley game...
...actually, it was the Harvest Moon that pushed me over the edge.
The games are Sports Illustrated Golf Classic (valued at about $1), Buzz Lightyear of Star Command ($1), Harvest Moon GBC ($9), The New Adventures of Mary-Kate and Ashley ($1), Mighty Morphin' Power Rangers ($4), Centipede ($1), Top Rank Tennis ($1), Ultra Golf ($2), and Space Invaders ($4). So at around $24, this set is the star, regardless of quality. But hey, I love Harvest Moon games.

Next, a Goodwill. Sometimes you're out at a store and just think, "Y'know what? Damnit, I need some N64 games." Then you grab them all up and overpay like crazy.
Or maybe that's just me.
Anyway, the games are WCW vs NWO World Tour ($1), Hey You, Pikachu ($2) and Rayman 2 ($6). I paid almost $13. Yes, yes, I'm ashamed, but you know what? I don't care at all abut pro wrestling, and normally dislike pro wrestling games as a result. Wrestling games developed by AKI, though, are in a class of their own. I don't mind overpaying for that.
Besides, I'm still up around $10 in final value. So there!

Harvest Moon!
First stop was Salvation Army, which is always hit or miss where retro games are concerned. Today was a pretty big hit. Nine Game Boy games in a plastic bag, marked at $10.99 for the lot. I'd have passed, but then I saw that Mary-Kate and Ashley game...
...actually, it was the Harvest Moon that pushed me over the edge.
The games are Sports Illustrated Golf Classic (valued at about $1), Buzz Lightyear of Star Command ($1), Harvest Moon GBC ($9), The New Adventures of Mary-Kate and Ashley ($1), Mighty Morphin' Power Rangers ($4), Centipede ($1), Top Rank Tennis ($1), Ultra Golf ($2), and Space Invaders ($4). So at around $24, this set is the star, regardless of quality. But hey, I love Harvest Moon games.

And the "meh" collection.
Next, a Goodwill. Sometimes you're out at a store and just think, "Y'know what? Damnit, I need some N64 games." Then you grab them all up and overpay like crazy.
Or maybe that's just me.
Anyway, the games are WCW vs NWO World Tour ($1), Hey You, Pikachu ($2) and Rayman 2 ($6). I paid almost $13. Yes, yes, I'm ashamed, but you know what? I don't care at all abut pro wrestling, and normally dislike pro wrestling games as a result. Wrestling games developed by AKI, though, are in a class of their own. I don't mind overpaying for that.
Besides, I'm still up around $10 in final value. So there!
Subscribe to:
Posts (Atom)